
HP-35 Calculator Living in an Adafruit Macropad RP2040
It's not quite done, but - more coding to do, but I've been working on getting HP's first pocket calculator running as an emulator on the…
more...

New(ish) Year, New Blog
Yep. switching up the blog tech stack one more time. This time using Gatsby which is based on React and getting deployed using AWS…
more...

Jekyll On AWS Amplify
Here I am, changing the hosting / backend / whatever on this blog again. This time, I'm going with AWS Amplify. It will let me do continuous…
more...

FlatCAM Install On OS X Mojave with Vagrant and VirtualBox
I've seen a number of tutorials on how easy it was to create milled PCBs using FlatCAM to create the gcode from gerber files. Well, what…
more...

Steps to Jekyll hosting on S3 and CloudFront with SSL with Forestry.io Deployment
Here are the steps I went through to get a new / fresh blog up using Jekyll and deployed to Amazon S3 using Forestry.io with CloudFront and…
more...

Adafruit Trinket-based Sync Track for Teenage Engineering Pocket Operators
An Adafruit Trinket -based button that outputs a Teenage Engineering Pocket Operator sync track. I made this Trinket version after I made…
more...

AVR Dragon Quick Connector for ATtiny85 and ATtiny2313 / ATtiny4313
Here are two more AVR Dragon quick connectors available at OSH Park . An ATtiny2313 / ATtiny2414 version and an ATtiny13 / ATtiny2…
more...

Dipping a toe in the Amazon Lambda waters
Websites with no infrastructure, let's see how this works...
more...

Hot Glue Halloween Cobwebs
We're all into Halloween around here... Here's how we made some cobwebs using only a hot glue gun and glue. Step one: Dispense the glue on a…
more...
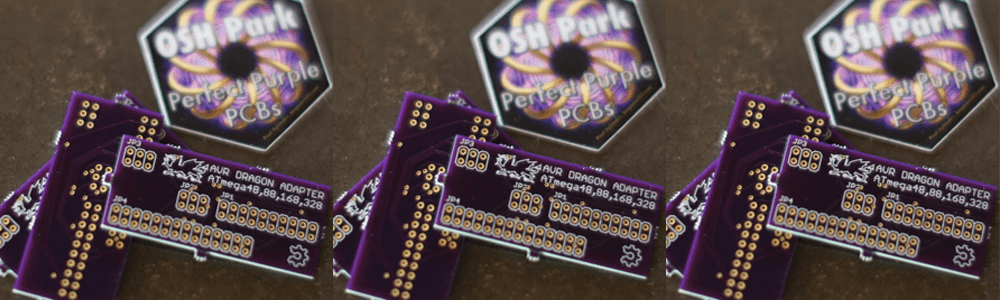
AVR Dragon Quick Connector PCB From OSH Park
OSH Park pretty much rules. This was my first toe into making a PCB to be produced. I used Eagle to design it and OSH Park to get it…
more...
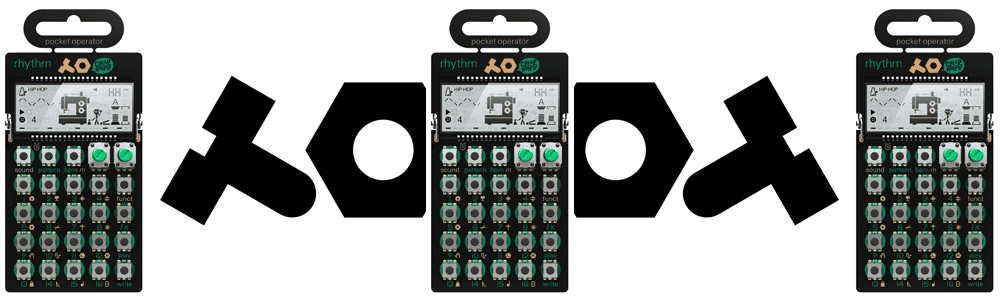
Teenage Engineering Pocket Operator Tap Sync
This little project is finally coming together. Here are the parts I settled on. The button was going to be an arcade-style button, but I…
more...
A Mostly No Arduino ATtiny85 I2C LCD
This is hacked to all get out , but using some sometimes modded Arduino libraries as a start and info found all over the net, I finally…
more...
Tap BPM for Teenage Engineering Pocket Operator
I have a Teenage Engineering Pocket Operator (PO-12) and it's pretty cool. One thing I felt was missing, though, was a way to tap a button…
more...
Display Raspberry Pi webcam video to screen
So, this is how to display your Raspberry Pi USB webcam video to your screen (without X windows). It's all rather simple once you Google all…
more...
Ubiquiti AP Setup Debugging
While trying out a Ubiquiti wifi solution, I ran into one AP not getting installed correctly. It was showing as either disconnected or…
more...
Using Platformio with ESP8266 Arduino 2.1.0-rc2 release candidate
In order to get Platformio to build a project based on ESP8266 release candidate, I had to do the following - basically these instructions…
more...
Adafruit Feather ESP8266 module - Arduino IDE settings
These are the settings that got me up and going- before this I was getting warning: espcomm_sync failed error: espcomm_open failed error
more...
PlatformIO Investigation
While looking around for a good library to parse JSON on an Arduino, I bumped into PlatformIO . This seems to address a problem I've been…
more...
ES8266 / DHT22 - Wi-Fi / Temperature & Humidity server (example mashup)
Here's a quick (couple hours with my sloppy mistakes) mashup of two Arduino examples - the ES8266 (HUZZAH from Adafruit) WiFi controller and…
more...
Update to using an ATtiny85 in a Similar Way To An Adafruit Trinket - specifically to run the Adafruit Neopixel library
I'm continuing to try and 'cheap-ify' my per effect cost for my Halloween decorations. I ran into some issues last night trying to get an…
more...
Revisiting ATtiny85 Software-Based PWM to Drive RGB LED
I'm digging up some old code that I did a long time ago - It's a software-based pulse width modulator (PWM) for AVR microprocessors. The…
more...
Setting My ATtiny85 Fuses To Mimic The Adafruit Trinket
To get a Adafruit Trinket Arduino sketch running on a straight-up ATtiny85, I did the following: I set the fuses of the ATtiny85 to what I…
more...
Getting my AVR Dragon to talk to the Arduino IDE on OSX
I added the following to /Applications/Arduino.app/Contents/Java/hardware/arduino/avr/programmers.txt and restarted the Arduino IDE and…
more...
AVR Dragon and OSX (trying it out again)
I've been inspired by my 4yo son to get back into some electronics for a spooky Halloween display we're planning on setting up this year…
more...
Controlling Vera home automation Z-Wave controller with Amazon Echo by running an emulator on a Raspberry Pi
This is all made possible by a nifty little Java app written by armzilla . Here's a quick explanation of the setup: Amazon Echo Raspberry…
more...
Starting somthing on Raspberry Pi boot...
This seems to be the easiest way to start something up on bootup of Rasperian... run crontab -u pi -e and add @reboot sh /home/pi/amazon…
more...
Tooling for a new project - choices, choices, choices...
Here's the front-end development stack that I'm leaning towards for a new build that I'm contemplating (at this specific momement): React…
more...
Managing Jekyll with rake
Since jekyll is a ruby tool, I'm using rake to manage it. Here's my Rakefile
more...
Trying out a bash Jekyll creation script
This seems to work- it opens up the markdown file in vi (which I suppose is what my bash editor is set to) so that will take some getting…
more...
Clever floating point rounding in JavaScript
This is clever toFixed(x) converts the number to a string and prefixing with the '+' converts it back to a number. Found here
more...
npm: One tool to rule them all...
After trying to sort out what a toolset should be for standard JS / HTML / possibly Node development, I'm narrowing on just using npm. Here…
more...
Trying out Codeship
Stumbled across Codeship and decided to give it a shot. Works a little similar to deploying to Heroku which I'm already doing, so it…
more...
npm Error - " glob error { [Error: EMFILE, readdir ... "
Found the answer why this was happening here: http://blog.izs.me/post/56827866110/wtf-is-emfile-and-why-does-it-happen-to-me Posting it…
more...
mysql.h is missing. please check your installation of mysql and try again.
Ugh, this is a bear, but after many empty Googled alleyways, I stumbled on this post that fixed the issue... She can explain better- http…
more...
C99 Mode - Whatever that is...
So, I've never dabbled in C until now while using it with AVR microcontrollers - and while trying to complie a simple for loop: I got this…
more...
ATtiny software PWM to drive RGB LED
Based on Atmel's AVR136: Low-Jitter Multi-Channel Software PWM Application note, here's a 3 channel software-based pulse width modulator…
more...
AVR ATTiny85 Makefile
This is what I'm using as a Makefile - based on what was included in a downloaded XCode template project - Can't remember where I downloaded…
more...
Arduino / AVR ATTiny
Starting to play around with Arduino and straight-up AVR ATTiny microprocessors... Here are some resources I've found helpful so far:
more...
Backing up your DB on a Capistrano deployment
Yeah, it's simple but useful. Since I'm using sqlite at the moment, it's just a copy but you could run any command in a similar way. I'm…
more...
Been neglecting this blog 'cause I've been busy.
Going to start reviewing what went down with my little app though.
more...
Facebook OAuth with Sinatra
This MOSTLY is working, so, here's what I found when trying to connect to Facebook with OAuth. It needs some serious refactoring because…
more...
Capistrano deploy to multiple locations
Pretty simple, but wanted to log here so I can look this up in the future... I wanted to deploy to both a stage and a live site. Here's how…
more...
Lost sleep over JSON and Rack::PostBodyContentTypeParser
I've been fighting this issue the last couple nights. I wrote earlier about how Rack::PostBodyContentTypeParser can automagically turn a…
more...
Couldn't get that last thing to work so keeping it simple (stupid)
This could undoubtedly be more elegant, but it's late and I want it to work now. May take another stab at it later... Setting up a before…
more...
Doing something different depending on file extension (MIME type) in Sinatra
This looks like a solution: sinatra-respond_to
more...
Using Rack middleware to parse JSON
In attempting to AJAX-ize the site, I had the desire to handle JSON as if it were form post data. Queue a Rack middleware solution. <a href…
more...
AJAX-izing
Working on making the site more app-like. In doing so, found the Prototype.js-based library, LivePipe . The documentation is poor, but what…
more...
Battling autotest
Looking for a reason that autotest is skipping some of my test files.... I think I'll just comment the exception line out for now as I don't…
more...
Rack::Test and request / response objects
Rack::Test uses last_response and last_request objects instead of Rack's typical request and response objects. This is probably…
more...
When tests are acting strange and you can't figure out what's wrong...
Check that you didn't copy / paste / didn't change the test class definition line. example: My BlogPost class was mis-titled... There…
more...
Including common routines in test_helper.rb
I should have done this earlier. To do a number of tests, I have to repeat the same actions like create a user, log a user in, etc. I was…
more...
AWS S3 using AWS/S3 Ruby gem
working on storing files to Amazon's S3 web service. Here's what I've come up with so far: then a: Will upload the the file to the Amazon…
more...
Broken chain...
Well, I've been working on this thing, but have not making the kind of progress I would like. I blame this on a few things, but mainly we've…
more...
Storing a Ruby object in Rack::Session will probably clobber the session
In my case it was an OAuth request token and when it was serialized it must have been larger than the cookie limit. Spent too much time on…
more...
CSS sprites for buttons
Found these login buttons online which have three states - normal, hover and visited. This makes them perfect to use as a CSS sprite, so…
more...
Haml and Google SMTP for email
I first thought that I would have to use ERB to render non-HTML-like templates. Not true. Haml let you do a :plain filter which is pretty…
more...
Setting a domain name (env['HTTP_HOST']) to use in Rack::Test
This may not be the best way to do this, but this is what I used at the top of my test file so that a helper method has a value for Rack's…
more...
Taking a pass on URLs that aren't supposed to exist (in Sinatra)
This is simple, but I'm dumping it here anyway... I'd like to use the Twitter model of account access: http://example.com/USERNAME So, if…
more...
Trying out Pony for email
Email is going to be used to activate an account, and I'm leaning towards using the Pony gem to simplify the creations and sending. Here's…
more...
More on OpenID
I'm now working on user creation process... This was what I was trying to eliminate by using OpenID - but realistically, while OpenID may be…
more...
Using haml for view templates, ERB for email templates...
and I'm not sure how I feel about this. Maybe I should use <a href="http://github.com/defunkt/mustache">Mustache</a> for tempting because…
more...
Digging discoverable OpenID providers
Here's a list of big-time OpenID providers that are discoverable. This means you don't need an exact URL, which is cool... Additionally, if…
more...
OpenID doesn't solve the entire problem...
So it looks like I have to create the whole user model anyway. Blast. I could use Facebook Connect or Twitter OAuth, but then users without…
more...
Testing helpers in Sinatra
How do you test your helper methods in a Sinatra::Base app? Include them in your tests...
more...
Facebook is NOT an OpenID provider
According to this , it appears that Facebook is NOT an OpenID provider.
more...
Testing Rack::Flash in Sinatra
Here's a slightly dumb way to test Rack::Flash in a Sinatra app...
more...
Building Fund-A-Stache...
I'm going to document the building of Fund-A-Stache so I know what's going on next year. Here goes nothing...
more...
Looking for a pretty code viewer for this blog...
Here's some code as a test: and I want it to look nice. How can we do that with Wordpress?
more...